Raspberry Poké Ball Cookies
Almond / raspberry / white chocolate
Catch the last cookie.
Kitchen Mode and Timer
Keep the recipe at hand during preparation.
Enables JavaScript to use the kitchen tools.
Visual Timer: Keeps this page open. It does not sound an alarm. The cooking remains to be monitored.
That's all you need!
Equip me with a pack.If you miss something, choose your ingredients from Monoprix and your utensils on Amazon. Adjust the quantities to your guests, then uncheck what you already have.
Choose the number of guests and uncheck what you already have at home.
This sheet indicates a yield in parts or in weight. Specify your basis for calculating the races.
Your selection contains only the checked items. Check products and availability at Monoprix for ingredients, on Amazon for utensils.
Amazon Affiliate Links. As an Amazon Associate, I earn from qualifying purchases.
Your choices are memorized on this device.
It's up to you.
15 detailed steps, from preparation to service.
Weigh and separate dough, garnish and decor
Prepare a scale, a large bowl, a small bowl, a fork, a roll and two baking tray. Weigh separately the 220 g of flour, the 60 g of ground almonds, the 140 g of cold butter and the 80 g of icing sugar from the dough. Keep aside the 150 g of jam and the 20 g of finishing icing sugar: they do not go into the dough. Set aside the chocolates from the decor.
Sanding the cold butter
Cut the 140 g of butter into small cubes of about 1 cm. Pour the flour, ground almonds and 80 g of icing sugar into the bowl, mix with the spoon and then add the butter. Quickly rubs the pieces between the thumb and other fingers to crush them in dry ingredients. Stop when the mixture looks like wet sand with small grains: do not try to form a ball yet.
Add the egg without kneading
Break the egg in a small bowl, remove any piece of shell, then beat it with a fork for 20 to 30 seconds to mix white and yolks. Add it to the sandy mixture with the vanilla teaspoon. Mix first with the fork, then press the dough with the palm to collect the crumbs. As soon as it stands, stop working on it: a prolonged kneading would make the biscuits less crumbly.
Cool the dough
Divide the dough into two parts and flatten each into 2 cm thick cake. Wrap them or place them in a closed box and then put them in the refrigerator for 1 hour. The dough must be firm but can flatten under the roll; if it becomes too hard, leave it on the worktop for 5 minutes before spreading.
Preparing the oven and baking tray
Place an oven rack at mid-height and preheat the oven to 170 °C in conventional oven setting (no fan). Cut the baking paper to the dimensions of both baking tray and place it flat. Work one dough cake at a time: leave the other in the refrigerator to prevent the butter from softening during cutting.
Spread to a regular thickness
Place the first cake between two sheets of baking paper. Pass the roller from the center to the edges by turning the whole regularly to obtain a thickness of 3 mm everywhere. Take off the sheet from the top gently. If the dough sticks to the paper or deforms when you lift it, put it back in the refrigerator for 10 minutes before cutting.
Cut the bases and tops
With the 5 cm cookie cutter, cut 36 discs by pressing well vertically. Keep 18 whole discs for bases; in the other 18, removes a central circle of 1 cm. These windows will show the raspberry: they should not be stuck to the decor.
Transfer cookies without distorting them
Slide a thin spatula under each piece and place it on the paper of the plate, leaving 2 cm between cookies. Collect the offcuts without kneading them and spread them out again to complete the 36 pieces. If there is dough left after these 18 pairs, cut out some extra cookies and cook them separately: they do not count in the 18 sandwiches advertised.
Cook one baking tray at a time
Bake the first baking tray for 10 to 12 minutes, then cook the second in the same way. Start looking at 10 minutes: the edges should be slightly golden, while the top remains clear. Small cookies made with the offcuts can cook faster; remove them as soon as their edges color. Use oven gloves to pull out the plates.
Cool before any finish
Leave cookies on their plate for 5 minutes without touching them: they are fragile when they are hot. Use the spatula to transfer them to a wire rack and leave for about 30 minutes, until completely cool. Combines the bases and tops of similar dimensions; keeps the tops flat to decorate them in the next step.
Color the chocolate of the upper half
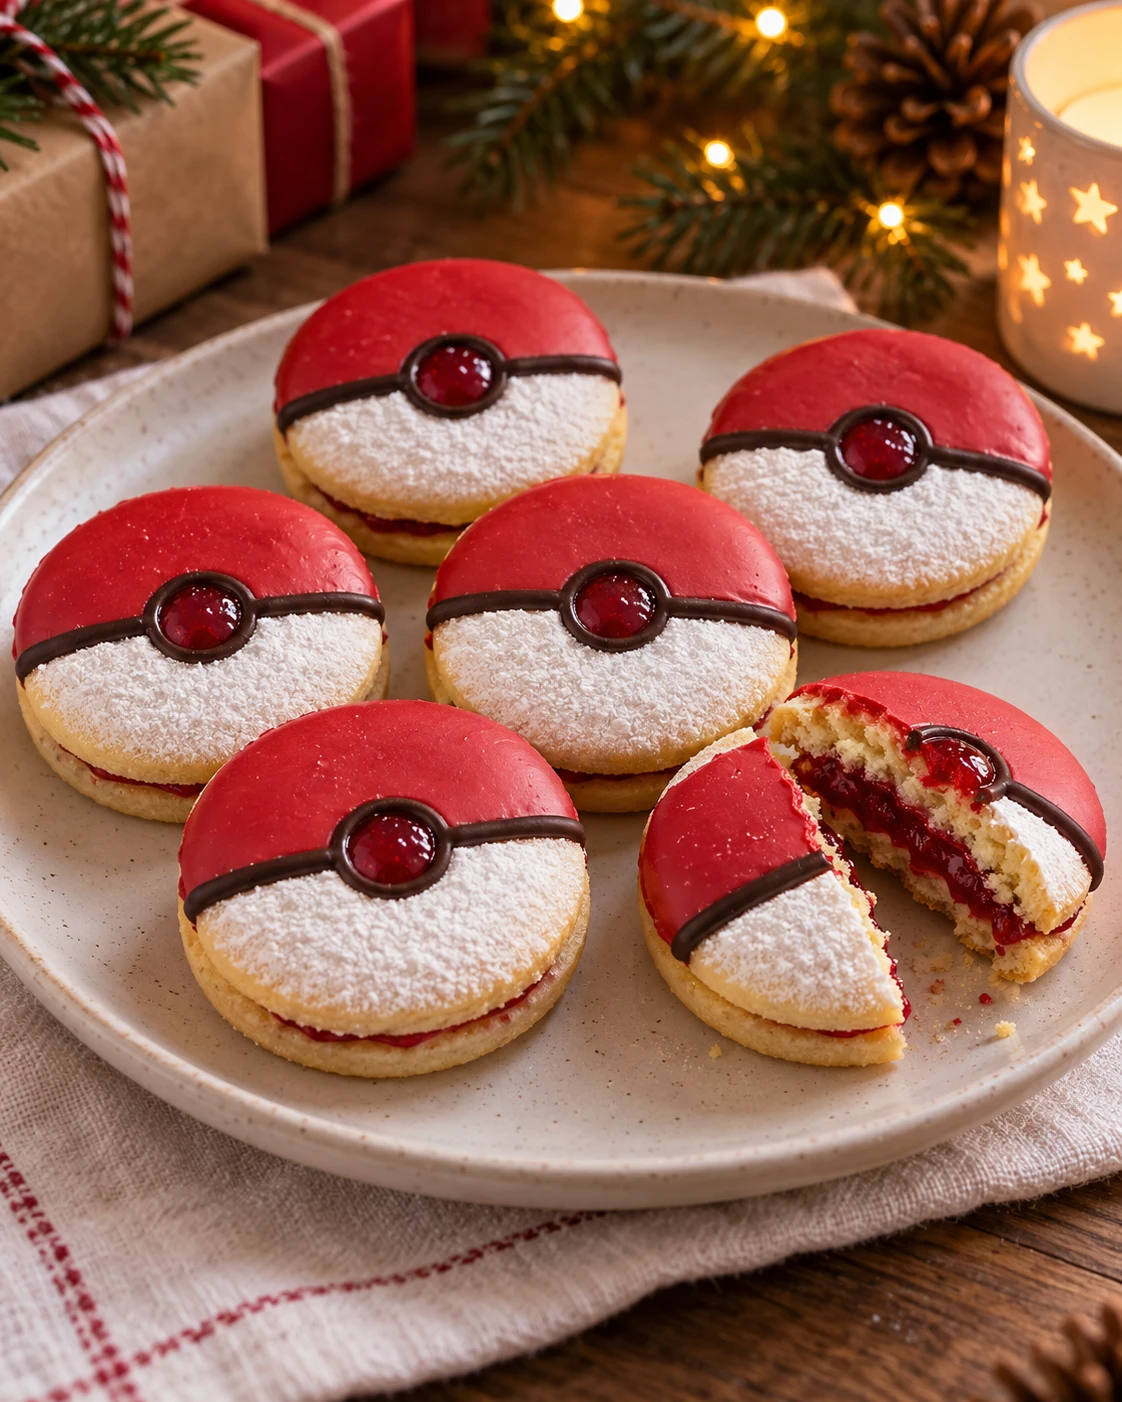
Chop 80 g of white chocolate with a knife and put it in a small, perfectly dry bowl. Place the bowl on a saucepan containing 2 cm of barely simmering water, without the bottom of the bowl touching the water. Stir gently with the spatula and remove the bowl as soon as the pieces are almost melted; continue to stir off the heat. Wipe the bottom of the bowl before moving it: no drop of water should enter the chocolate. Add a very small amount of dietary fat-soluble red dye according to its package leaflet and blends; gradually increases without exceeding the recommended dose. Put the 18 openwork on the paper. With the back of a small spoon, spread a thin red layer on their upper half, stopping at the edge of the window so as not to butcher it.
Powdering the lower half
Let the red chocolate take about 20 to 30 minutes in a cool room: it should no longer stick to a light touch. Place a small strip of paper on the red half to protect it and then sift the 20 g of icing sugar over the bottom half of the cookies. Remove the covers gently. Some of the sugar will remain on paper; don’t try to stack all that surplus on cookies.
Draw the black stripe of the Poké Ball
Chop 20 g of dark chocolate with a knife and put it in a small, perfectly dry bowl. Place the bowl on a saucepan containing 2 cm of barely simmering water, without the bottom of the bowl touching the water. Stir gently with the spatula and remove the bowl as soon as the pieces are almost melted; continue to stir off the heat. Wipe the bottom of the bowl before moving it: no drop of water should enter the chocolate. Pour the chocolate into a small baking paper cone or piping bag, fold the top and cut an opening of 1 to 2 mm. Test on a piece of paper: the chocolate should flow with gentle pressure, without running on its own. Hold the tip a few millimetres above the surface and guide it with your hand, without dragging the decoration. Draw a horizontal strip in the middle of each top, at the junction of red and white, stopping on either side of the window. Surrounds this window with a simple black circle without filling it. Let stand for 20 minutes flat.
Garnish and assemble the eighteen cookies
Stir the 150 g of raspberry jam with a spoon to soften it, without heating it. Deposits about 8 g, or a generous spoon, in the middle of each whole base and spreads keeping 2 mm free at the edge. Gently place a decorated top and press barely on the perimeter: the jam must appear in the window, without overflowing on the sides. Spread the last bit of jam between the bases before closing.
Let the sandwiches stick
Let the assembled cookies sit flat for 30 minutes before moving or storing them. If there is any chocolate left, spread it in small pellets on paper, let it harden and keep it for another use; do not thicken the strips to empty the cornet. Store the cookies in a box, separating the layers with baking paper to protect the windows and decor.
Conservation. 3 days in a refrigerator box; take out 15 minutes before tasting.
Namely. Recipe proposal: follow the quantities and texture marks of the card. Indicative times. The rendering depends on the ingredients and materials used. The objects of the photographic decoration remain out of the dish.
Baking tips for this recipe
- Work the dough just enough to combine the ingredients after adding flour; avoid prolonged kneading.
- Respect the temperature of the butter and the indicated rest. If a cutting paste becomes sticky, cool it before shaping.
- Keep a regular thickness between pieces of the same batch and monitors the edges at the end of cooking. Let cool before garnishing.
Substitutions and variations
To replace a main ingredient, choose another sheet designed with the one you want to use. Changing the proportions of fat, sugar or liquid can change the hold of the dessert.
Keep the type of chocolate provided for the structure or ganache. Switching from dark chocolate to white chocolate changes the balance: the quantities do not transpose directly.
More treats for your Christmas table
Recipes that share ingredients or the same preparation family.