Gingerbread Sponges
Honey / spices / chocolate pistachio
The sponge that deserves a plate.
Kitchen Mode and Timer
Keep the recipe at hand during preparation.
Enables JavaScript to use the kitchen tools.
Visual Timer: Keeps this page open. It does not sound an alarm. The cooking remains to be monitored.
That's all you need!
Equip me with a pack.If you miss something, choose your ingredients from Monoprix and your utensils on Amazon. Adjust the quantities to your guests, then uncheck what you already have.
Choose the number of guests and uncheck what you already have at home.
This sheet indicates a yield in parts or in weight. Specify your basis for calculating the races.
Your selection contains only the checked items. Check products and availability at Monoprix for ingredients, on Amazon for utensils.
Amazon Affiliate Links. As an Amazon Associate, I earn from qualifying purchases.
Your choices are memorized on this device.
It's up to you.
15 detailed steps, from preparation to service.
Preparing the oven and mould
Turn the oven on at 160 °C in conventional oven setting (no fan), with an oven rack at mid-height. Cut a strip of baking paper long enough to line the bottom and large sides of the 24 cm cake mold, letting it overhang for demoulding. Lightly cool the paper and then unfold it so that it marries the mold; this avoids using extra butter.
Weigh ingredients in two containers
Put 250 g of flour, 10 g of baking powder, 6 g of sweet four-spice and 1 pinch of salt in a bowl. In a small saucepan, pour 150 ml of milk, 200 g of honey, 80 g of brown sugar and 50 g of butter cut into small cubes. Keep the egg in a separate bowl and reserve all the ingredients of the decor.
Dissolve honey and melt butter
Place the pan on a low heat. Stir with a spatula on the bottom, for 3 to 5 minutes, until the butter is melted and the brown sugar dissolved. The mixture must be homogeneous; it does not need to boil. Remove the pan from the heat as soon as there is no more butter left.
Let cool before adding the egg
Leave the pan off the heat for about 10 minutes, stirring two or three times to evacuate the heat. Check with a thermometer: the mixture must be below 40 °C. Break the egg into a small bowl, remove any pieces of shell and beat with a fork until the white and yolk are mixed.
Mixing liquids and dry ingredients
Pour the beaten egg into the warm saucepan and whisk together. Stir the dry ingredients in the bowl with a dry whisk to distribute the baking powder and spices well, then dig a small well in the center. Pour the liquid three times into this well, gently whisking from the center to the edges to gradually incorporate the flour.
Finish the dough without beating it for a long time
Scrape the sides and bottom of the bowl with the spatula to recover all the flour. Mix just until a thick and homogeneous paste is obtained, without a dry powder piping bag. A few tiny lumps are less troublesome than a prolonged mixture; stop as soon as the ingredients are incorporated. Do not add milk to make the dough more liquid.
Filling the mould and baking
Pour all the dough into the prepared pan, scraping the bowl. Slightly smooth the top with the back of the spatula, then place the mold on the oven rack. Bake 45 to 55 minutes; avoid opening the door for the first 35 minutes so as not to drop the cake during cooking.
Controlling cooking in the center
From 45 minutes, plant a skewer in the center of the cake, in the thickest part. It should come out without liquid dough, possibly with some wet crumbs; if it is covered with dough, continue for 5 minutes and then check again. If the top turns brown too fast, cover it with a sheet of baking paper without letting it touch the heating elements.
Unmould without breaking the cake
Remove the mold with oven gloves and place it on a heat-resistant surface. Wait 15 minutes, then lift the cake using the edges of the paper. Put it on a wire rack, spread the paper and let it cool completely, at least 1 hour; the bottom should no longer be warm before packaging.
Allow the crumb to stabilize until the next day
Pack the cold cake or put it in a closed box, at cool room temperature. Ideally wait until the next day before cutting it: the crumb will be easier to cut and the spices will have time to distribute. Plan this recipe over two days, even if the actual working time remains short.
Cut out ten small cake sponges
Place the cold cake on a board and only remove its bulging top with a bread knife. Cut it into five sections of the same length, then divide each into two to obtain 10 low pavers of about 5 x 4 cm, adapting slightly to the shape of the mold. Choose a large flat face for the top of each sponge and keep all offcuts for service.
Prepare the chocolate and the green layer
Chop the 100 g of white chocolate and put them in a small, perfectly dry bowl. Pour 2 cm of water into a saucepan, heat until it simmers and then lower the heat. Set the bowl over the pan without letting it touch the water. Stir with a spatula and remove as soon as the last pieces melt. Wipe the bottom of the bowl: no drop of water should fall into the chocolate. Weigh 35 g of finely chopped unsalted pistachios in a bowl. If pieces are still large, cut them with a knife: a layer of small chips adheres better than an entirely fine powder or whole pistachios.
Spread a thin white layer
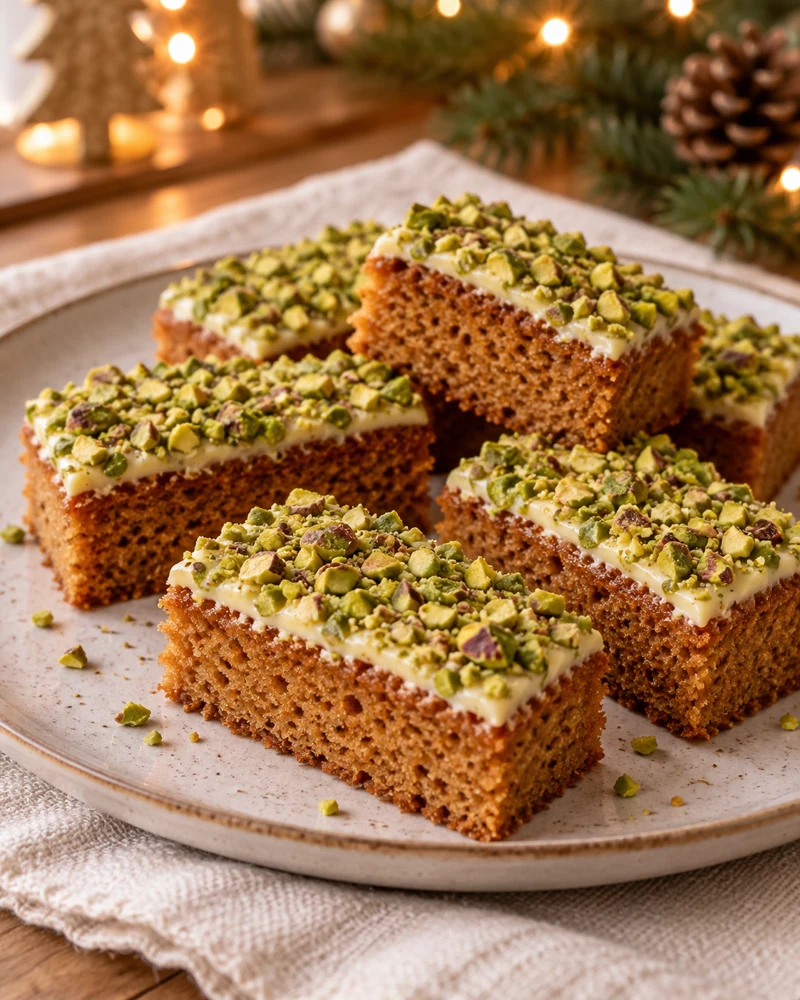
Lay the 10 pavers face up on baking paper. Place about 10 g of white chocolate on each, then spread with the back of a small spoon to cover this face on 1 to 2 mm thick. Stop at the edge: the sides of the gingerbread should remain naked and show their crumb texture.
Fix the pistachios without tamping the cake
Immediately sprinkle each face covered with pistachios by spreading them over the 10 cake squares, or about 3.5 g per piece. Press very lightly with the back of a dry spoon to stick the chocolate chips, without sinking the crumb. Collect the pistachios that have fallen on the paper and redistribute them on the still white areas.
Allow to be taken and served
Let it take 30 minutes in a cool room, until the top layer no longer sticks to the finger. Move the pavers with a spatula and cut one in half to clearly reveal the gingerbread. Presents the offcuts in a cup: these sponges are completely pastry-free, with no accessories added to the plate.
Conservation. 4 days in an airtight box at cool room temperature.
Namely. Recipe proposal: follow the quantities and texture marks of the card. Indicative times. The rendering depends on the ingredients and materials used. The objects of the photographic decoration remain out of the dish.
Baking tips for this recipe
- Preheat the oven according to the plug and prepare the mold before mixing the last ingredients.
- Uses the dimensions and cooking mode indicated: a higher or wider mold changes the cooking of the center.
- Follow the visual cues of step by step in addition to the duration. Respect the intended cooling before unmoulding or decorating.
Substitutions and variations
You can choose a sweeter or more full-bodied honey, keeping the indicated amount. Replacing honey with dry sugar, on the other hand, requires a review of the recipe.
Keep the type of chocolate provided for the structure or ganache. Switching from dark chocolate to white chocolate changes the balance: the quantities do not transpose directly.
More treats for your Christmas table
Recipes that share ingredients or the same preparation family.