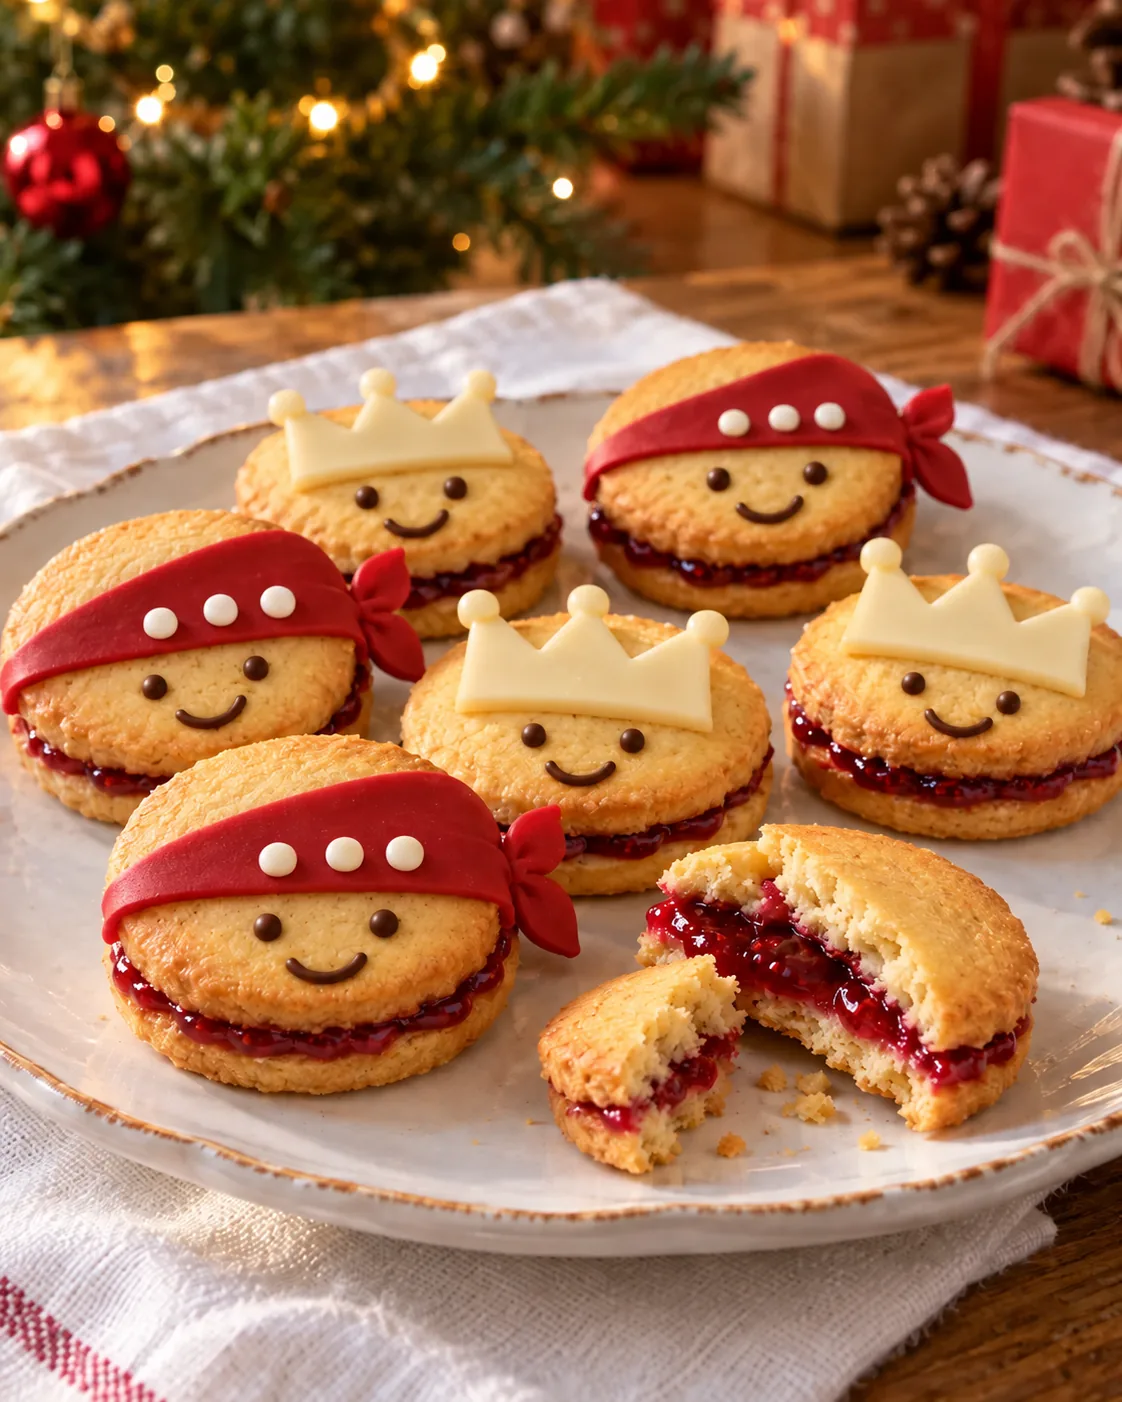
Bandana & Crown Shortbread
Almond / raspberry / white chocolate
Two rap icons, one box to share.
Kitchen Mode and Timer
Keep the recipe at hand during preparation.
Enables JavaScript to use the kitchen tools.
Visual Timer: Keeps this page open. It does not sound an alarm. The cooking remains to be monitored.
That's all you need!
Equip me with a pack.If you miss something, choose your ingredients from Monoprix and your utensils on Amazon. Adjust the quantities to your guests, then uncheck what you already have.
Choose the number of guests and uncheck what you already have at home.
This sheet indicates a yield in parts or in weight. Specify your basis for calculating the races.
Your selection contains only the checked items. Check products and availability at Monoprix for ingredients, on Amazon for utensils.
Amazon Affiliate Links. As an Amazon Associate, I earn from qualifying purchases.
Your choices are memorized on this device.
It's up to you.
15 detailed steps, from preparation to service.
Weigh the dough and keep the decor apart
Place a bowl on the scale and separately weigh 220 g of flour, 60 g of ground almonds, 140 g of cold butter and 80 g of icing sugar. Reserve in other containers the 150 g of jam and the 20 g of finishing icing sugar; they do not go into the dough. Cut the butter into small cubes of about 1 cm. Prepare two sheets of baking paper and a roll. Also reserve 15 g of dark chocolate in a small dry bowl: they will only serve eyes and smiles.
Rub together with your fingertips
Pour the flour, ground almonds and 80 g of icing sugar into the bowl; mix with a spoon. Add the cold butter cubes. Take small handles between your fingers and rub gently to coat and crush the butter in the dry ingredients, for 3 to 4 minutes. Stop as soon as the mixture looks like coarse sand, without a large piece of butter; do not knead it for long with the palms, which would warm it.
Add the egg without kneading
Break the egg in a small bowl, check that it contains no shell, then beat it with a fork with the vanilla teaspoon for about twenty seconds. Pour it all into the bowl. Mix with the spatula, then gather the crumbs with your hands by pressing them against each other. As soon as the dough fits into a ball, stop: it does not need to become elastic.
Cool the dough for an hour
Flatten the ball in two 2 cm thick discs; they will cool more regularly than a large ball. Wrap them and place them in the refrigerator for 1 hour. The dough should be firm, but be able to bend slightly without breaking. If it has become very hard, leave one disc 5 minutes on the worktop before spreading it; keep the other cold.
Prepare plates and spread to 3 mm
Turn the oven on at 170°C in conventional oven setting (no fan) and place the grill in the middle. Cover two baking paper baking tray. Lay a disc of dough between two other sheets of paper and pass the roll from the center to the edges by turning the dough regularly. Aim for a uniform thickness of 3 mm: too thin areas would brown before the others. Remove the sheet from the top without abruptly pulling.
Cut the shapes into pairs
With a round cookie cutter of 5 cm, cut 36 solid discs, without central window. Lift each piece with a flat spatula and place it on a plate, 2 cm from its neighbors. Gather the offcuts without kneading them and spread them a second time. Any dough remaining after the 36 pieces can be baked into additional small cookies, on a separate plate, or frozen raw; do not enlarge the planned pieces.
Strengthen and cook one baking tray at a time
Slips the cut shapes in the refrigerator for 15 minutes so that they keep their contours better. Then bake a baking tray in the middle of the oven for 10 to 12 minutes. Start looking at 10 minutes: the edges should be barely golden and the center still clear. Remove the plate with oven gloves and cook the second in the same way; keep it cool while the first one is cooked.
Cooling without breaking cookies
Leave the cookies on their baking tray for 5 minutes: at the exit of the oven they are still fragile. Then slide a spatula underneath and place them on a wire rack. Wait about 30 minutes, until they are completely cold to the touch, above and below. Set aside 18 bases and 18 tops of similar size.
Garnish and close the 18 sandwiches
Reserve nine of the tops for the white crowns; with a small colander, powder them slightly by taking on the 20 g of finish icing sugar. Stir the 150 g of jam with a spoon to soften it, then divide it between the 18 bases, or about 8 g per cookie. Spread it leaving 3 to 4 mm free at the edge. Put a top on each base and press very gently in the center, just so that the jam almost arrives at the edge. Let the sandwiches sit flat while you prepare the decor.
Melt white chocolate and separate colors
Chop the 60 g of white chocolate with a knife and put them in a small, perfectly dry bowl. Pour 2 cm of water into a saucepan and simmer gently, then lower the heat. Place the bowl above: its bottom should not touch the water. Stir with a spatula until only a few small pieces remain. Remove the bowl from the heat and keep stirring so the residual heat melts them. Wipe the bottom of the bowl; no drop of water should fall into the chocolate. Weigh 20 g of this chocolate melted in a small bowl and keep them white. The remaining 40 g will be red: incorporates the fat-soluble dye in small spikes up to the desired color, without exceeding the intended gram or the manufacturer's dose. Mix after each addition; do not use water-based dye.
Draw nine red bandanas
Place a small cone of baking paper in a glass, point down, and half fill it with a spoon. Fold over the top to keep chocolate away from your hand, then cut a 2 to 3 mm opening at the tip. Pipe a test line on the paper: a continuous ribbon should flow when you squeeze gently. Fill this first cone with the red chocolate. On nine unpowdered tops, draw a wide strip in the upper third of the cookie, then add at one end two small triangles that evoke the sides of the knot. Keep the drawing flat on the cookie and leaves part of the shortbread visible. Place the nine cookies on the tray without tilting them and wait 10 minutes for the band to start holding.
Add points and nine crowns
Prepare a second cone with the remaining 20 g of white chocolate. Place three large white dots on each of the nine bandanas, then use the rest to draw a crown on each of the nine powdered tops. On the nine powdered tops, gently remove the sugar only on the future plot with a dry food brush so that the chocolate adheres to the cookie. For the crown, first draw a small horizontal base, then three large connected points, without looking for fine details. If the chocolate freezes in the cone, heat it gently in your hands before continuing; any leftovers are hardened on paper for reuse.
Melt the chocolate of small faces
Chop the 15 g of dark chocolate and place them in the small, perfectly dry bowl. Place this bowl on a saucepan containing a warm water bottom, over low heat; the bottom of the bowl should not touch the water. Stir gently with a spoon for 2 to 3 minutes, then remove the bowl when a few small pieces remain. Mixing off the heat until they have melted. Wipe the bottom of the bowl and leave the chocolate to cool for 2 to 3 minutes: it must run in fine fillet, without being hot.
Draw two eyes and a smile on each shortbread
Pour the dark chocolate into a third small cone of baking paper, fold the top and cut an opening of about 1 mm at the tip. Try it on baking paper. On the biscuit part visible under each bandana or crown, place two small dots spaced about 1 cm apart for the eyes. Then trace just below a small rounded U about 1 cm wide for the smile. Keep the drawings thin and flat; it only takes three small gestures per cookie. On powdered shortbread, remove the sugar from the spots of the face with a dry food brush before depositing the chocolate, so that it adheres. Repeat the 18 sandwiches, counting about 10 minutes for the whole. The planned 15 g include the chocolate that remains in the cone; no need to deposit everything on the cookies.
Have both reasons taken and presented
Leave the sandwiches flat in a cool room for 30 minutes, or a few minutes in the fridge if the chocolate stays soft. At the touch, the decorations must be firm and no longer mark the finger. Resting also allows the jam to stick the two cookies; lift them holding the base, never by drawing. No more powdering faces once drawn: eyes and smiles must remain visible. It is normal not to use all the finishing sugar.
Conservation. 3 days in a refrigerator box; take out 15 minutes before tasting.
Namely. Recipe proposal: follow the quantities and texture marks of the card. Indicative times. The rendering depends on the ingredients and materials used. The objects of the photographic decoration remain out of the dish.
Baking tips for this recipe
- Work the dough just enough to combine the ingredients after adding flour; avoid prolonged kneading.
- Respect the temperature of the butter and the indicated rest. If a cutting paste becomes sticky, cool it before shaping.
- Keep a regular thickness between pieces of the same batch and monitors the edges at the end of cooking. Let cool before garnishing.
Substitutions and variations
To replace a main ingredient, choose another sheet designed with the one you want to use. Changing the proportions of fat, sugar or liquid can change the hold of the dessert.
Keep the type of chocolate provided for the structure or ganache. Switching from dark chocolate to white chocolate changes the balance: the quantities do not transpose directly.
More treats for your Christmas table
Recipes that share ingredients or the same preparation family.