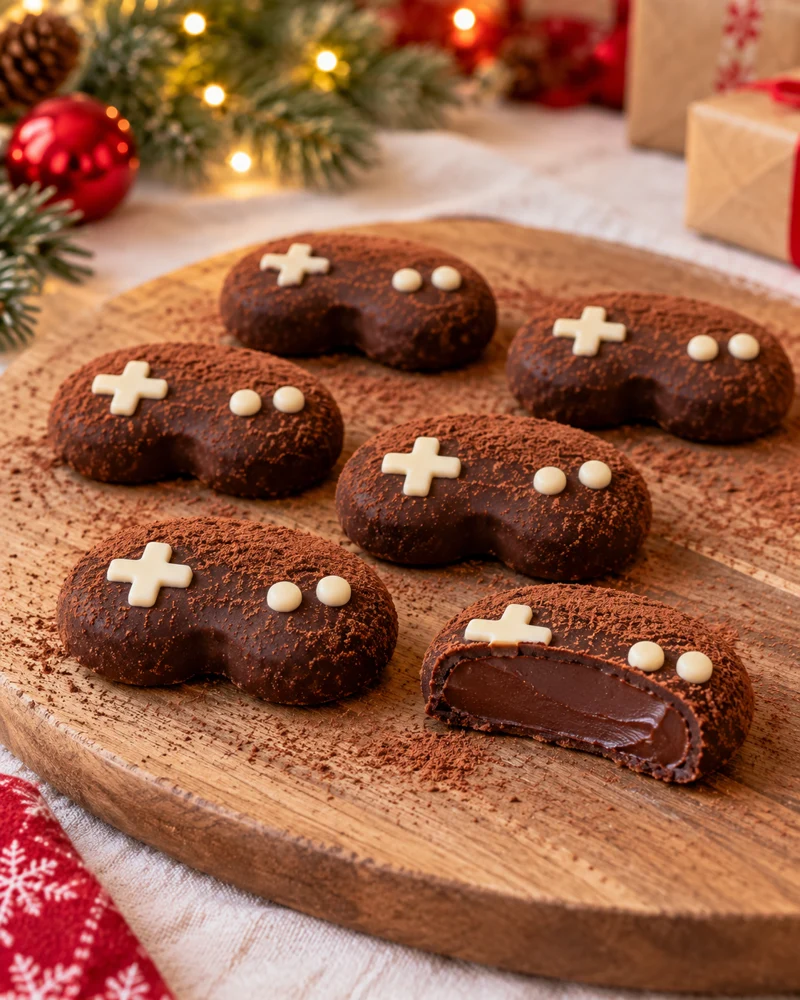
Mini Controller Truffles
Dark chocolate / cocoa / white chocolate
One controller, one bite.
Kitchen Mode and Timer
Keep the recipe at hand during preparation.
Enables JavaScript to use the kitchen tools.
Visual Timer: Keeps this page open. It does not sound an alarm. The cooking remains to be monitored.
That's all you need!
Equip me with a pack.If you miss something, choose your ingredients from Monoprix and your utensils on Amazon. Adjust the quantities to your guests, then uncheck what you already have.
Choose the number of guests and uncheck what you already have at home.
This sheet indicates a yield in parts or in weight. Specify your basis for calculating the races.
Your selection contains only the checked items. Check products and availability at Monoprix for ingredients, on Amazon for utensils.
Amazon Affiliate Links. As an Amazon Associate, I earn from qualifying purchases.
Your choices are memorized on this device.
It's up to you.
12 detailed steps, from preparation to service.
Prepare chocolate and butter
Weigh 250 g of 60% dark chocolate, 150 ml of whipping cream, 30 g of butter and 40 g of unsweetened cocoa. Keep the white chocolate of the decor separate: it does not go into the ganache. Chop the dark chocolate into small pieces with a knife on a board and pour it into a bowl. Cut the 30 g of butter into small dice and let them wait in a cup.
Heat the cream to the first bubbles
Pour the 150 ml of cream into a small saucepan and heat over medium heat. Monitor the edges: as soon as small bubbles appear and steam emerges, remove the pan from the heat. The cream should be very hot without boiling for a long time or reducing. Keep a soft whisk or spatula handy to mix right from the first addition.
Make a smooth ganache in three additions
Pour about a third of the hot cream over the chopped chocolate and wait 30 seconds. Mix with the spatula by making small circles in the center of the bowl; the mass becomes thick and shiny. Add a second third of the cream, mix the same way, then pour the last third by scraping the pan. Finish by extending the movements to the edges: there must no longer remain a piece of hard chocolate.
Incorporate butter at the right temperature
Let the ganache cool for a few minutes by stirring it: it must be around 35 to 40 ° C, still fluid but more burning. Add the 30 g of diced butter and mix gently until completely gone. Avoid whipping vigorously, which would incorporate air bubbles. The finished ganache should be smooth, supple and uniformly shiny.
Refrigerate for three hours
Pour the ganache into a shallow dish to obtain a regular layer of 2 to 3 cm maximum. Cover the dish and place it in the refrigerator for 3 hours. To check the hold, take a little ganache with a spoon: it must detach in soft mass and keep its shape. If it is still flowing, prolong the cold; if it is too hard, wait 5 to 10 minutes at room temperature before portioning.
Prepare the tray and share the ganache
Cover a tray with baking paper and put the 40 g of cocoa in a hollow plate. With two small spoons, share the ganache in 24 portions of about 18 g; the scale can help you for the first. Put them on paper without sticking them to each other. Keep half of the servings in the refrigerator while you shape the other half, especially if the room is warm.
Shape quickly with fresh hands
Take a portion and roll it a few seconds between your palms to round it up. Lay it on the paper, gently flatten it into a 4 cm oval, then slightly pinch the middle of the bottom edge to draw two rounded handles. Keep a sufficient thickness, about 1 cm, and a simple silhouette: do not dig a deep notch that would break the controller. If the ganache starts to stick and spread, put the portions back in the refrigerator 10 to 15 minutes before continuing.
Powder without masking the shape
Place each lever in the cocoa, gently turn it over and then remove it with a fork or two spoons. Tap very lightly to remove excess and keep the outline of the handles visible. Put the 24 pieces on the baking paper and place them 15 minutes in the cool. The remaining cocoa on the plate is the excess labour; do not pour it on the serving dish.
Preparing the chocolate of the buttons
Chop the 50 g of white chocolate with a knife and put them in a small, perfectly dry bowl. Pour 2 cm of water into a saucepan and simmer gently, then lower the heat. Place the bowl above: its bottom should not touch the water. Stir with a spatula until only a few small pieces remain. Remove the bowl from the heat and keep stirring so the residual heat melts them. Wipe the bottom of the bowl; no drop of water should fall into the chocolate. Let it cool down until it flows in a fairly thick ribbon, without being hot on contact with a spoon. Place a small cone of baking paper in a glass, point down, and half fill it with a spoon. Fold over the top to keep chocolate away from your hand, then cut a 2 to 3 mm opening at the tip. Pipe a test line on the paper: a continuous ribbon should flow when you squeeze gently.
Draw a cross on the left
Place the cold controllers flat, all oriented with the notch at the bottom. On the left half of each, draw a small horizontal line and then a vertical line that crosses it, to form a thick cross. Keep the four arms short, away from the edges of the ganache. If the tip of the cone hooks the cocoa, raise it slightly and let the chocolate settle without scratching the surface.
Place two buttons on the right
On the right half of each controller, drop two large white chocolate dots well separated. For a round dot, press gently and then stop pressing before raising your hand. Spread the 50 g of chocolate between the 24 controllers, without adding joysticks or small embossed elements. Remnants in the cornet can harden on paper for future use.
Strengthen and serve without distorting
Place the controllers in the refrigerator for 30 minutes, until the white dots are firm. Lift each piece with a small spatula and store it flat in a box, separating the layers with baking paper if necessary. Keep them in the refrigerator and take them out about 10 minutes before serving. The joysticks remain melting truffles: do not leave them in the hands or near a source of heat.
Conservation. 5 days in the refrigerator in a closed box.
Namely. Recipe proposal: follow the quantities and texture marks of the card. Indicative times. The rendering depends on the ingredients and materials used. The objects of the photographic decoration remain out of the dish.
Baking tips for this recipe
- Chop the chocolate into regular pieces to facilitate its melting on contact with the cream.
- Mix in the center and gradually widen the gesture to obtain a smooth ganache, without unnecessarily incorporating air.
- Respect the indicated rest and temperature of use: a warm, soft or cold ganache does not work in the same way.
Substitutions and variations
To replace a main ingredient, choose another sheet designed with the one you want to use. Changing the proportions of fat, sugar or liquid can change the hold of the dessert.
Keep the type of chocolate provided for the structure or ganache. Switching from dark chocolate to white chocolate changes the balance: the quantities do not transpose directly.
More treats for your Christmas table
Recipes that share ingredients or the same preparation family.