THE FESTIVAL CARNET
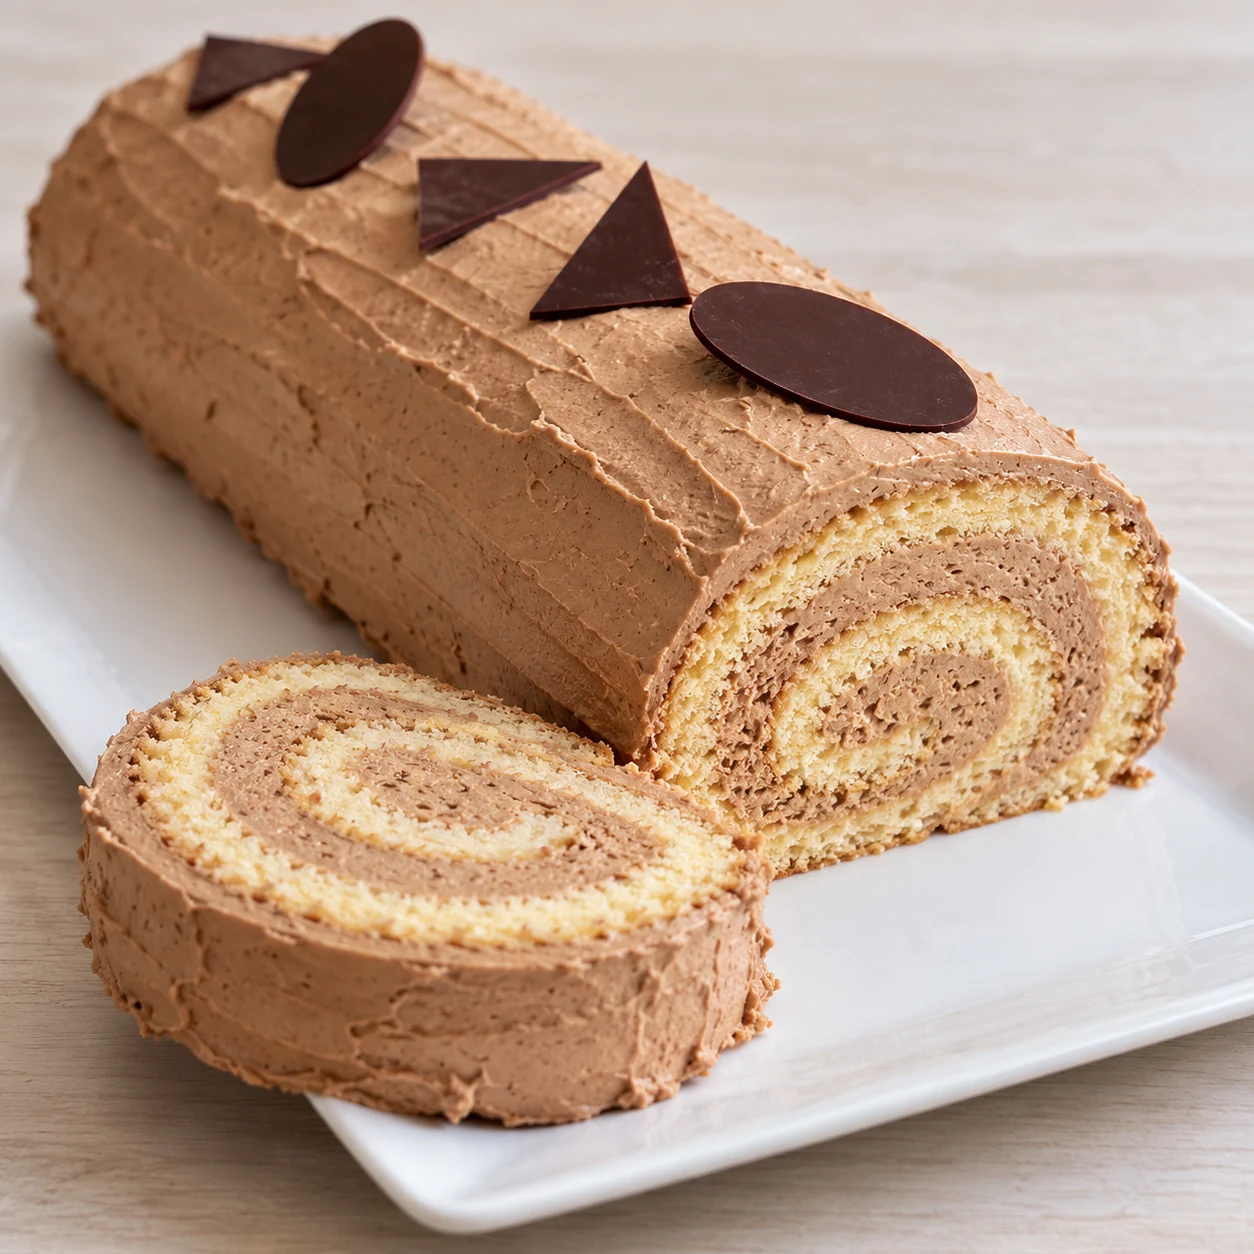
Milk Chocolate Yule Log with Little Christmas Trees
Christmas recipe: Milk chocolate stick and small fir trees. Preparation: 65 min. Ingredients and detailed steps.
Kitchen Mode and Timer
Keep the recipe at hand during preparation.
Enables JavaScript to use the kitchen tools.
Visual Timer: Keeps this page open. It does not sound an alarm. The cooking remains to be monitored.
Milk chocolate log and small fir trees combines light brown ganache ascent. The sponge is rolled after cooling to keep a flexible spiral.
Weigh all the ingredients before starting. The steps explain the essential cooling: a hot preparation should never meet the cream.
The decor remains deliberately simple: a surface worked with a spoon and a legible cut. The times are indicative; check the texture at each step. This creation is proposed for the domestic kitchen.
Organizes the components in parallel: during their cooling, prepares the rest of the weighing and the equipment. The displayed rest time assumes that the independent coolings overlap; if you prepare all the elements successively, add up the times of each step.
That's all you need!
Equip me with a pack.If you miss something, choose your ingredients from Monoprix and your utensils on Amazon. Adjust the quantities to your guests, then uncheck what you already have.
Choose the number of guests and uncheck what you already have at home.
This sheet indicates a yield in parts or in weight. Specify your basis for calculating the races.
Your selection contains only the checked items. Check products and availability at Monoprix for ingredients, on Amazon for utensils.
Amazon Affiliate Links. As an Amazon Associate, I earn from qualifying purchases.
Your choices are memorized on this device.
The preparation step by step
Prepare the oven and weigh
Preheat the oven to 180 °C, conventional oven setting (no fan). Line a 30 × 40 cm rimmed baking tray with baking paper and weigh all the ingredients. Melt the 20 g butter and allow it to cool until lukewarm.
Separate the four eggs
Break the eggs one by one into a small bowl to check their condition. Separate the whites from the yolks with clean hands or a separator. Put the four yolks in one mixing bowl and the four whites in another, perfectly clean, dry bowl. Keep all traces of yolk out of the whites, as yolk prevents them from whipping properly.
Whisk the yolks and whites
Whisk the yolks with 70 g sugar for 3 minutes until pale and thick enough to leave a ribbon. Wash and dry the whisks. Whisk the egg whites with the pinch of salt. When foamy, add the remaining 30 g sugar in three additions. Stop when the egg whites form soft peaks.
Fold in dry ingredients without breaking the foam
Fold a third of the egg whites into the yolk mixture using a spatula. Add the 100 g sifted flour in two additions, alternating with the remaining egg whites. Fold the batter from the bottom up, turning the bowl as you work. Mix two spoonfuls of batter into the lukewarm butter, then pour this back into the mixing bowl.
Spread and bake the sponge
Spread the batter evenly into the corners of the tray. Bake on the middle shelf for 10 to 12 minutes. The surface should spring back when pressed lightly and should no longer feel sticky. Avoid overbaking: a dry sponge will crack when rolled.
Prerolled and cooled
Moisten a clean dishcloth, then wring it out very carefully. Turn the hot sponge onto the towel, lift off the tray and peel away the baking paper. Roll up the sponge with the tea towel inside, starting from a 30 cm side. Let it cool completely for 30 minutes. Keep the towel inside for this first roll; remove it when filling and assembling the cake.
Chop the chocolate
Finely chop the 180 g of milk chocolate and place them in a dry bowl. Heat the 120 g of cream in a saucepan until the first frizz. Turn off the heat immediately.
Emulsify the ganache
Pour a third of the hot cream over the chocolate. Stir in the centre with a spatula until a glossy core forms. Add the other two thirds one after the other while continuing to mix. Avoid whisking, so that no air bubbles are incorporated.
Mature the ganache
Add the 230 g of cold cream, mix, then press cling film directly onto the surface. Refrigerate for 8 hours. The mixture must be cold all the way through before whisking; half an hour in the refrigerator is not enough.
Whip the cold ganache
Pour the ganache into a refrigerated bowl. Whisk on medium speed for 1 to 3 minutes, watching continuously. Stop as soon as the whisk leaves trails and the mixture holds on the whisk. Overwhipped ganache becomes grainy; use it as soon as it is softly whipped.
Spread the cold garnish
Gently unroll the completely cold sponge and remove the tea towel. Reserve about a third of the cream for the outside. Spread the remaining two-thirds evenly, leaving a 2 cm clear border along the 30 cm edge where the roll will close.
Roll without crushing
Roll from the side opposite the empty border. Guide the first turn with your fingers, then lift the towel to help roll the sponge, keeping the towel outside the cake. Place the log seam-side down on the serving plate. Cover it without compressing and refrigerate for 2 hours. Keep the reserved cream refrigerated too.
Cover and Finish
Loosen the reserved cream with a spatula, then spread it over the sides and top of the log. Make large marks with the back of a spoon. A slightly irregular finish is enough; do not look for a perfectly smooth shell. Keep the ends visible to show the spiral.
Draw the small decorations
Melt the 40 g of dark chocolate in a bain-marie. Spread it on baking paper in a 3 mm baking tray. When it starts to freeze but remains flexible, knife-cut four small triangles 3 cm high and two flat ovals 2 cm high, then refrigerate 20 minutes.
Put the decorations on the log
Take off the hardened shapes and places the triangles flat or slightly inclined on the top of the log. Both ovals can evoke simple fawn ears. Keep the shapes small and supported by the cream, without sculpture or fine branches.
Serve regular shares
Dip the knife blade in hot water, wipe it thoroughly, then slice without crushing the cake. Wipe the blade between slices to keep the layers clearly defined. Take out only the amount you plan to serve and return the rest of the log to the refrigerator.
Conservation. Keep the covered log at a maximum of 4°C and consume it within 48 hours of mounting. Do not leave the cream dessert at room temperature for long.
Recipe proposal with quantities and step by step. Times vary depending on the material: follow also the markers of texture and cooking.
The benchmarks for success
Respect the format
1 log rolled 30 cm, 8 parts. Use the indicated plate of 30 x 40 cm: a smaller plate gives a sponge too thick to roll. Do not double the dough on the same plate.
Working at the right temperature
The sponge should be completely cold before assembly. Never pour a warm preparation over a cream; let each component reach the indicated texture before continuing.
Questions Before You Start
Can I prepare this log in advance?
Yes, prepare it the day before and keep it covered in the refrigerator. The cream should never stay overnight at room temperature.
What to do if the trim becomes too soft?
Cool the ganache for 20 minutes if it heats up. A whipped ganache must have matured 8 hours and remain cold; stop whipping as soon as it holds. If it becomes grainy, do not prolong whipping. An unmounted ganache should simply thicken at the spatula.
Baking tips for this recipe
- Chop the chocolate into regular pieces to facilitate its melting on contact with the cream.
- Mix in the center and gradually widen the gesture to obtain a smooth ganache, without unnecessarily incorporating air.
- Respect the indicated rest and temperature of use: a warm, soft or cold ganache does not work in the same way.
Substitutions and variations
To replace a main ingredient, choose another sheet designed with the one you want to use. Changing the proportions of fat, sugar or liquid can change the hold of the dessert.
Keep the type of chocolate provided for the structure or ganache. Switching from dark chocolate to white chocolate changes the balance: the quantities do not transpose directly.
More treats for your Christmas table
Recipes that share ingredients or the same preparation family.